Tuesday 30 June 2015

Painted Terracotta Pot Beaded Chimes


It's hot hot hot! I am not going to complain one bit, it's been a long time coming this summer! I do wish I had an air conditioner though. We had one in our previous house, but the set up of this house makes having one a tricky thing! I managed to vacuum downstairs before getting too hot. Upstairs will have to wait till later!

So while I am cooling off with a nice cold drink, I thought I would share these easy wind chimes with you all. Well I say wind chimes, they don't actually chime, but you get the idea.


The garden coming into bloom!


I actually made these last year but didn't thread the beads on strong enough thread. I was constantly worried they were going to drop and break.

All you will need for this craft is :-

Plain terracotta pots, any size that you fancy as long as they are not too big as that may put too much strain on the wire you use to thread the beads.
A selection of beads. I purchase a mixed pot from Hobbycraft along with some smaller packets of beads in colours that matched the paint I was using.
Acrylic paint. I chose 3 different colours for variety, shown below.


Clear sealer. Easier to use than the bottled varnish and weather proof.


Wire to string the beads with. I used florist wire.

Firstly paint your pots.  The pots took 2 to 3 coats of paint to develop a nice deep even colour.


Once fully dried, spray your pots with the sealer. It is best to build this up in a couple of coats. Plus it gives the pots a lovely sheen. I don't plan to have this out all year round, just the summer months.

Take a selection of beads, either matching them to your painted pots, or being completely abstract! I decided to select beads in similar colours with a few tonal beads added in.

I selected lots of simple pony beads to thread on which would mainly be in the pots and therefore not visable. All the pretty beads I strung after these so they could be seen.


Purples and Pinks.


Greens and Pinks, plus a bike charm I picked up a long time ago.


Blues with Orange.

I eyeballed how much wire I would need and the rough gap I wanted between each pot and cut it to size. I began by knotting the bike charm at the base of the wire, then threaded on my green and pink beads, followed by a set of green pony beads. I kept one larger bead back which would sit at the hole on the base of each pot to keep the pots in place. The green pot was then threaded over the top of these beads. I then moved onto the blue set of beads, doing the same thing. Finally I added the purple beads. I made a loop with the wire at the end and reinforced this with extra wire wrapped around the loop and the top of the wire thread.


And that's it!

I love how they add a little colour to the garden.


You do want to hang them on a strong branch as they are quite heavy.


I love the bike charm!


Have a lovely warm sunny week!


Thursday 25 June 2015

Arm knitted chunky blanket

So I've mentioned my master bedroom makeover a few times. We are finally back in the bedroom but it's still not quite finished! Yes we have all the furniture, new floor and blinds, but all the little details have yet to be put in place or purchased! At the moment the walls look a little bare but we shall get there eventually!

One of the things I had made in readiness for the makeover was an arm knitted blanket. I made infinity scarves at Christmas so decided to go for a bigger project! I can't knit and I am slowly learning to crochet so this gives me instant and satisfying results!

I couldn't get on with watching a video of how to knit but found a step by step photo tutorial which was perfect.  I've already shared the tutorial from Flax and Twine but here it is again!

I couldn't get the super chunky wool that she uses in her tutorial so decided to devise my own version of chunky!


I made one long runner style blanket first off using this wool.


This wool is classed as chunky but it's not chunky enough for the look I was going for.


It looks pretty chunky close up.


But when it was laid out, it just didn't have the chunky look.

I decided to make another blanket exactly the same dimensions.


Well that was the plan!! I didn't eyeball it correctly and ended up with a smaller piece! I needed to make an additional one so quickly whipped up a smaller piece. I then laid all the pieces on top of one another and started to attach together using the method described in the tutorial. I did this round all 4 sides.


This meant that I ended up with a super chunky runner for my bed! I used 8 balls of wall to complete my small blanket.

Now it looks pretty chunky. It does not have a super neat finish but I'm OK with that!


I love how it looks in the bedroom and how well it goes with all my new stuff!

Have you made an arm knitted item? Do you like the look? Share on Facebook.

Have a great weekend!


Tuesday 23 June 2015

No sew Burlap Table Runner

How did your Father's Day go? I was sadly working but as I work at a gliding club, I was able to treat my husband to a flight in one of the club's gliders. He liked it so much he went up again later that afternoon. I got to spend lots of time with him and my son who became our youngest receptionist that afternoon! My manager kindly took my boy for a trip round the airfield which he was super excited about. It's lovely working in such a nice sociable relaxed environment. We treated my husband to a meal out in the evening rounding off a lovely fun day for him.

When we aren't out to eat (which isn't very often I have to say), I love to cook. Since I began meal planning, I've found how much easier it is to just make something from scratch that we can all enjoy and love to eat. Sure I pick quick and easy meals (I fully utilise my slow cooker!) for weekdays but knowing it's all homemade is very satisfying.

We have not changed our kitchen since we moved into the house over 7 years ago. It was put in the year we moved so we decided to live with it, even though the layout is bonkers (lots of wasted space) and the style is not to our taste. We were pretty appalled by the state of the ceiling and the walls however, so a couple of years ago I painted it a lovely warm yellow and bought and made some wall art to make the place feel more like ours. I got some new appliances and cake stands which has transformed the kitchen into a place I like to be. 


We have this gorgeous tile top dining table which went beautifully with the changes, but it still felt like something was missing. I started looking for ideas on Pinterest and saw lots of crafts with burlap. I really liked the idea of a table runner and decided burlap was the way to go! I like old fashioned, vintage style items over modern and burlap fits the criteria, not to mention blending in well with my kitchen!

I remembered seeing some small rolls of burlap in Hobbycraft, so went off to investigate. I bought a large 2m roll in cream (you can purchase online here) rather than the darker more usual shade of burlap. I also bought some cream fabric paint and a reel of lace trim (purchase here).


I already had other fabric paint colours, so gathered them together so that I could decide what would look best with the cream.

Firstly I unrolled the burlap and laid it out on the table.


The 2m roll was the perfect size for my table with a little overhang at each end. As you can see it is frayed as you would expect. I have very little sewing skills and decided that I would glue the lace trim to the edges of the burlap.


I trimmed the frayed part down but left a little for the lace to adhere to. I found some large pieces of card and placed them under the burlap to protect the table. By completing the project on the actual table it was for helped with the design and scale.


I measured out some of the ribbon for the ends and cut with just a little overhang. The reel I used was 5m which was the exact amount I needed to do all four edges.


I next drew a thin layer of fabric glue and gently placed the ribbon down from one end to the next, pressing down as I went along.


I followed this same method on the sides. I glued both ends first and then the sides so that the ribbon from the sides would be stuck over the top of the ends. When the glue was dry, I trimmed away the last pieces of the frayed edges that were showing next to the ribbon edge. For the detail on the runner I used a home made stencil. You could easily buy one.

I found a leaf border over on The Graphics Fairy which reminded me of the painted olives on my dining table. They seemed Italian in design! I then used PicMonkey to design a monogram with the border and printed it out on A4 card.


I chose a fairly simple border that would be easy to cut out. The font was kept simple for the same reason. I used a craft knife and carefully cut out each segment of the border and letter. This was surprisingly easy and took me about half an hour to complete.


I laid the runner out flat so I knew how much overhang there would be on each side. I then laid the cut stencil out on one end of the runner near the edge of the table. The cream fabric paint I purchased was too close to the colour of the runner so I decided to use yellow and blue to match the kitchen and the table. I took a small sponge to dab the paint onto the stencil.


I used a bit of tape to hold the stencil in place and used the fabric paint very sparingly so as to not bleed or smudge the design. When I took the stencil off I took a very thin paintbrush to fill in any gaps or pale areas of the design. I also decided that the F looked a little washed out on the burlap, so outlined that in blue to match.


Before edging.


After!

Some of the paint I used was actually acrylic craft paint rather than fabric paint. I have read that to set this in place you should iron it. I have to say I have yet to do this, but I am only planning to sponge clean the runner rather than wash it to stop it fraying any further.

I am so pleased with how this turned out. It has given my table a new lease of life!

I decided to keep the design uniform and re used the stencil on the other end of the runner. The stencil could probably have been used a couple more times if I had wished. I would certainly use that method again for customised designs.

When the sun shines the whole kitchen feels warm and cosy!

Do you like burlap? Have you used it in any crafts? Do you like a more vintage look or are you modern all the way? Share your experiences on my Facebook page. 

Have a great day!


Thursday 18 June 2015

Peanut Butter Cookies

Yay Summer has arrived! I have been getting so fed up of pulling sweaters out of the wardrobe every morning in June! Now I have finally been able to get out my cute summer outfits. With all that has been going on at the house I have not had the time to bake either so when a moment arose I grabbed it! There is something so comforting about peanut butter, rich, tasty, filling and so satisfying.

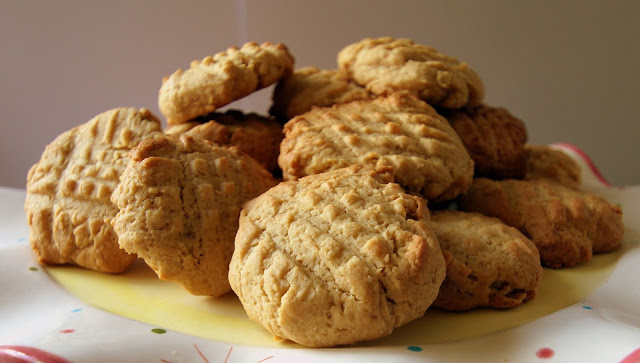
My Mum baked a lot and peanut butter cookies were a real treat I looked forward to. I decided it was time to make some for myself and of course the family.  These cookies are soft, thick, with a subtle peanut butter/salty taste. You will find it hard to just have one! Or is that just me!


These have the traditional fork imprints and will take you right back to your childhood.

Peanut Butter Cookies

Ingredients

Makes 18-20 cookies

1/2 cup butter
1/2 cup sugar
1/2 cup brown sugar
1 egg
1/2 cup peanut butter
1 1/2 cups plain flour
1/2 tsp baking soda
1/4 tsp salt

Method

1. Pre heat oven to 375'F/180'C. 
2. Cream the butter and sugars together until fluffy.
3. Beat in the egg and peanut butter until well incorporated.
4. Gradually mix in the flour, salt and baking soda until a dough is formed. You may need to use your hands to bring all the mixture together.
5. Use non stick baking trays or trays lined with greaseproof paper. 
6. Take a piece of dough and roll into a ball. Place on the tray. Once all cookies have been formed, take a fork and gently press down with the prongs. Take the fork again and press in the opposite direction.
7. Bake the cookies for 10 to 12 minutes until they start to turn golden. Turn out onto a rack to cool.

The cookies should be quite thick even after pressing down with the fork.

Golden slight crisp top with very soft middle.


Enjoy!

Perhaps make some for Dad this weekend?