Thursday 27 November 2014

CHRISTMAS CAKES - FONDANT MODELLING AND CUPCAKES!


The past few years have seen me work more and more with fondant. There are some great tutorials out there on the web and in books. Sometimes just looking at a picture is enough for me to figure out how to shape the fondant.  Sometimes the finish is not as smooth as I would like but I am a work in progress!

I love making toppers for a simple round cake, turning it into something quite special, I can spread the decorating over a day or 2 to enable the fondant to dry out and then it only takes me about an hour to cover and place the toppers onto the cake. Feels less stressful then spending hours doing it all at once!

Pinterest is a wonderful source of decorated cakes. 3 of my favourite cakes from the recent past came from pins I had seen. The first one here was pretty simple with just some fondant modelling and a lot of buttercream!


The original cake that inspired me had a smooth finish but I decided to make the cake look like a giant snow scene with snowmen springing up around the mounds of the white stuff! Plus this is a huge time saver! I used the original picture to help me shape my snowmen rather than searching for a tutorial. I did the same with the candy cane trim. See the original here.

I did a very similar cake the previous year with a snowy finish.


I found the inspiration photo for this cake before I joined Pinterest, and now can't find it! There are plenty of examples of these types of cakes around. Again I had no tutorial to follow so I just moulded the fondant how I saw fit.  Firstly there is a second smaller cake on top for the 'igloo'. This cake was made from half a ball pan. I found a small plastic rectangle on my home office desk and used this to imprint the fondant on the 'igloo' for bricks. I rolled a piece of fondant and wrapped it around a cardboard tube for the entrance to the 'igloo' while it dried to hold it's shape. The trees are made from ice cream cones covered in green buttercream piped using a leaf tip. The penguins were hand modelled from the picture.  I sprinkled a liberal dash of edible glitter and it was done!

For last years cake I took inspiration from this picture.


I liked the idea of having Santa on top of  a cake with his reindeer and a snowman. I searched for some tutorials and used thisthisthis and this as a guide. I made the toppers 2 days in advance so that I could place them easily on top of the cake. The holly was made using an old cookie cutter. Santa was a pain due mainly to how soft the fondant was. Next time I would add cornflour to help firm it up!


I was very pleased with the overall look of this cake.

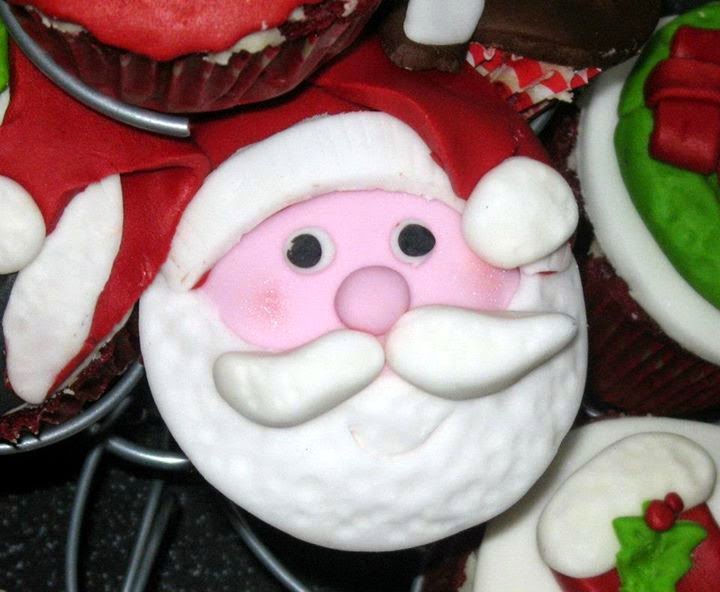
Lastly, if you find that a whole cake is just too much for your gathering, howabout cupcakes instead? You can really let your creative flair go to town by making each cupcake individual. Or you can pick a simple theme, like holly, and just make a bunch of matching toppers to place on top once iced. For the cupcakes below I decided to make them all different.


I knew I wanted Santa, reindeer and snowmen so used this picture as my main source of inspiration. I also liked the way other festive themes were used on the cupcakes.


Some I completely copied as is as I thought they were just too nice not to! I purchased some tiny cookie cutter shapes from Hobbycraft that weren't actually meant to be used as cookie cutters but did the job with small fondant shapes. They were actually supposed to be used for craft projects like scrapbooking, but they have come in very handy when I need a tiny shape!


I wanted a grand topper for the top cupcake so formed a Christmas tree from a large piece of fondant and even used one of my tiny cookie cutter shapes as it's star!


These were perfect for the small gathering I had that year and allowed me to be totally creative with the look of each!

For even more inspiration check out my Christmas cake design board and for lots of tutorials head here.

Happy decorating!

Tuesday 25 November 2014

CHRISTMAS CAKES - DECORATE IT! - SHAPED PANS


My favourite thing in the world to do is decorate cakes. Sure, sometimes the result is not quite what I wanted but I love creating something that we can all enjoy, or creating something special for a friend.

Christmas cakes are so much fun, looking for a design, having fun making fondant figures or piping rows upon rows of buttercream stars. I also like pulling out the Christmas themed cake pans I own and finding a new way to use them. I'm sharing below some of the cakes I have made over the years using shaped pans with either links on how to make them or may own instructions.

If you are having a large gathering or just like to have lots of options you can do a cake with a large gingerbread centerpiece.

Here I used the Wilton Cookie tree along with the Wilton House pan. The tree is discontinued but the Holiday Lights Cookie tree is similar. You can still purchase the House pan.You can purchase these items directly from Wilton or here for the pan and mini gingerbread trees here.


I followed the instructions for the cookie tree which came with its own base. I purchased a large cake board and covered it and the base of the tree in white buttercream to resemble snow. I also sprinkled some edible glitter onto the base.
The idea for the house came from an old Wilton cake decorating book. Bake the cake as per instructions, then cover the roof in white buttercream. Rough it up so again it looks like snow. Smooth some green buttercream onto the front part of the roof.  Take some more green icing and smooth on for windows. Finally get some white buttercream and smooth some on for the doorway. This doesn't have to be perfect as you will cover up with the basketweave and candies. Take a basketweave tip (like the Wilton 47 tip) and cover the front, back and sides of the cake. Finally tint a small amount red and pipe around the windows and form panes with a writing tip such as the Wilton tip 3. The final part is to add candies! You can use your imagination here to create a welcoming holiday house! I also managed to purchase a small wreath which worked well on the house door! This wasn't my best but it was easy and looks far more complicated than it actually is!

Wilton do some lovely seasonal pans so when I saw this snowman pan I knew I had to have it! Sadly the pan is discontinued, however, these do pop up on EBay once in a while. You could shape a snowman face from a round pan and a small square. I followed part of the instructions for the pan here.  However, I used fondant for the hat and buttercream stars for his face. I then used black and orange fondant for his features. This was incredibly easy and perfect if you are a beginner.


This star tip is a great starting base for pipe work.

Another pan that is sadly discontinued is the Wilton Treeliteful pan. I have used this pan many many times. Wilton do have this tree pan now which would give very similar results for the cake below.


The pan instructions here gives you a couple of ways to decorate. The design above came from another old Wilton cake decorating book. The sides and top were iced smooth with a pale blue buttercream. Then I used a leaf tip to pipe all over the tree. The leaves were piped downwards, overlapping from the bottom to the top. A large open tip was used for the lights, and a star tip was used to create the trunk. I bought a string of fake pearls and placed these on the cake, held in place by buttercream snow. The sides of the cake were finished off with a zig zag pattern which can be achieved using a star tip.

Finally you can have a little giggle at this one that I did quite a few years ago!! I wanted to do this Santa cake I had seen in yet another Wilton cake decorating book but I did not have the right pan or a chance to get hold of it. So I looked at what I had and used the Wilton Handsome Man pan! As the name suggests, this pan was to create burly types! My Mum always commented that my Santa looked 'well built'! This pan has long since been discontinued but a Santa could be carved from a rectangle cake.


This cake is again a mixture of fondant and buttercream. I iced the legs lightly then covered those in green fondant to represent Santa's sack. I then used the star tip to make Santa's suit, face, hat and gloves. I used the star tip again in a swirl motion to create Santa's beard and the fur trim on his suit. Fondant was used to create presents. To finish off the sides I piped zigzags in green using the star tip. He gave us a laugh and he tasted good!

Look out for my next blog post which will feature cakes make using round pans with fondant modelling and cupcakes!

Monday 24 November 2014

CHRISTMAS CAKES - MAKE IT!


My Dad bought my Mum a Wilton cake decorating kit when I was about 11. She started to use it and I got interested in what you could do using the tips and other equipment. She started letting me have a go and by the time I was 13 I was making all the family birthday cakes and Christmas cakes. My early attempts were pretty terrible (including a half baked cake!) but still my family indulged me and thankfully for everyone concerned, I got better!

I love making a cake for Christmas, choosing a design and even better, eating a slice! Coming from an American/English home, fruit cake never really featured. I did attempt to make one once, but it was so choc full of fruit that the batter had a hard time cooking! It was early on in my cake making days so I am sure I will attempt another one at some point!

I do like to choose something that tastes of or feels like Christmas though, peppermint, cranberry, orange, red velvet, spiced, the list goes on! I then have great fun choosing a design and decorating the cake so that it looks lovely and festive.

These are some of my favourite 'Christmas' cake recipes.

If you are nervous about making cakes you can doctor box mixes. A friend, (thanks Sarah!) recommended a book called 'The Cake Mix Doctor' by Anne Byrn (get it here). This is an American book taking regular box mixes, adding ingredients to them to make them taste more home made. My favourites from this book for Christmas are the Festive Cran-Orange cake which I frosted with orange buttercream, and Applesauce spice cake which I frosted with cinnamon buttercream. This recipe is similar to the spice cake version in my book Cinnamon apple spice cake.

I found some similar from scratch recipes.

Cranberry Orange Bundt cake
A fresh tart Cranberry Orange Bundt Cake topped with a sweet Orange Glaze! Its the perfect dessert recipe for the holidays. | www.joyfulhealthyeats.com

Doesn't that look delicious! Plus this is easy to convert to a regular shaped pan if you plan on decorating say a round cake.

A selection of apple spice cakes.

Apple spice cake with salted caramel frosting


Oh my, salted caramel frosting!

Apples and spice


That glaze would make this so quick and easy!

If you have never heard of the Hummingbird bakery or had a cake from one of their shops in London, I urge you to purchase their books! The recipes are easy to follow and I have never had a bad experience when using one of their recipes. My all time favourite is their Red velvet. I have made this as a whole cake and as cupcakes. A rich red colour, smooth batter, tasty cream cheese frosting, need I go on? Go herehere and here to get your hands on one of their books, you will not be disappointed.


For more inspiration head over to my cake boards where you will find many tasty bakes!

A selection of my boards!

Mint cakes
Candy Cane Cake

Spiced cakes
gingerbread cupcakes with cinnamon cream cheese frosting @King Arthur Flour

Come back tomorrow to see how I decorated up these tasty Christmas treats!

Wednesday 19 November 2014

HOMEMADE GIFT TAGS


One of the easiest ways to personalise your gifts is to make your own gift tags. I've been making my own for the past few years and enjoy picking out the perfect tag for each gift recipient.

Firstly you will need tags, ribbons and any embellishments you want to use like felt, stickers, small card making supplies etc.


I've gathered a lot over the past couple of years plus I bought some small wooden shapes and snowflake stickers.


I like to use a variety of ribbons and jute.

There really isn't any need for a how to with gift tags as it's a very personal thing. You can make them super simple but just adding festive stickers to plain tags like this one.


I added a little bow just to add a bit of interest!

Or you can get a bit more creative by using felt and making festive shapes. Here I got some small felt squares that I had from an embellishment box.


I cut the squares in half and then cut small triangles out of them to resemble bunting. I saw these and wanted to create something similar. I think it turned out well and makes a change from the usual festive shapes. Plus this idea would work well for many other occasions. 


I hand wrote the greeting but like the idea of printing this as well.

I also saw this bunting and liked the idea of mittens as Christmas decorations. So I took another 2 squares of felt, drew a mitten shape onto it, cut out, added another straight piece as the cuff, drew 'stitches' and glued a bow to the cuffs. I added a small pom pom to look like a snowball!


I have also used my new wooden shapes to embellish the tags quite simply.


I'll be making many more of these and it's fun to play around with the embellishments to see what I can come up with. If you make some share them on my Facebook page so can we can inspire one another!

Monday 17 November 2014

MUM'S BANANA BREAD

When I was a young girl, my Mum would bake a lot. Back then you didn't have such an array of ready made treats just waiting to be snapped up at the supermarket. I am so glad about this as I discovered my love of baking through my Mum and my Nan. 

My Mum had an index box which was crammed full of hand written recipes. The recipes had come from her Mum, Mother in law, Family Circle, basically any decent recipe was written down and filed. There would be favourites which would be used again and again and some which never saw the light of day! My Mum decided to get rid of her box of recipes as she had started to bake less and less as the years went by, but she saved those which had become family favourites (ie, those that I pestered her to make, even when I had left home!).

As a child I was a very fussy eater, so getting fruit and vegetables into me was a daily chore for my Mum. I detested most fruits, especially bananas (and to this day I cannot stand them!), but Mum's banana bread never tasted of the bananas, it just tasted yummy! She must have breathed a sigh of relief as I asked for a slice of this delicious bread!

The recipe is very simple and not very high on a banana taste. There is a hint there so if you like your banana bread to taste very much of bananas, add another banana or 2 into the mix!

Mmm, doesn't that look inviting??

The measurements for the recipe are in American cups. I come from a joint background of both American and English so have always had a set of baking cups for such recipes. These are easy to obtain or you can look up the equivalents using Google.

Ingredients

2 cups plain flour 
2 3/4 tsp baking powder
1/2 tsp salt
2/3 cup sugar
1/2 cup butter/marg/baking spread
2 eggs
1 cup mashed ripe bananas (approx 2-3 bananas)
1/2 cup chopped walnuts or 1 cup raisins (optional)

Method

Preheat oven to 350'c or 180'f.  Well grease or use cake release spray in your loaf pan. The loaf pan I have used is 1 1/2 litre.

Combine flour, baking powder and salt and set aside.


Cream butter and sugar (I did this the old fashioned way with a fork, just as my Mum used to do)


Light and fluffy.


Add eggs once creamed and lightly beat them in.

Add dry ingredients and banana alternately, ending with dry ingredients. Stir in any walnuts or raisins you may be adding.


Pour into your pan and smooth over the top. 


The original recipe states to bake the bread for 1hr 10min, however, that has resulted in my bread being over cooked and a little burnt. I suggest checking your bread after 40 minutes and then 5 minute increments until it is done. The bread is done once the sides pull away from the pan and the top is golden brown. I do use a toothpick to check that it is fully cooked. In my oven the bread takes around 45 minutes to cook.

Well risen, golden brown and sides have pulled away from the pan. (Please excuse the state of my pan, it has been used many many times!)


Fresh out of the oven is lovely or when it has completely cooled. My Mum always used to spread some butter onto the bread once it was sliced and I love it this way, but it is equally as tasty without!

 Delicious!

This is a perfect recipe for anybody to have a go at. It is simple, easy, few ingredients and steps. Happy baking!

Thursday 13 November 2014

QUICK AND EASY DIY GIFTS - PART THREE

So you have been all creative but the kids want in on the action? Here are some quick, easy and fun gifts the kids can make for the special people in their lives.

I spotted this idea on a blog (which I now can't remember!) where you traced the hand and lower arm to form a trunk and branches in fabric and then cut out a number of leaf shapes in different fabrics to stick onto the hand shape to form the leaves of the tree. The shapes were glued onto a hessian covered canvas. You can add the name of the child along with the date they made the picture. A nice keepsake for Grandparents especially!

 Another very quick craft is to paint or draw onto a glass with glass paint pens. You can then fill up the glass with the recipients favourite snack, stationary, bath supplies etc. A unique gift!


If you have kids that want to get a little more creative, they can make these easy felt cupcake magnets.
You will need a couple of different coloured felt sheets, ribbon, buttons, glue and magnets. Find yourself a cupcake template or freehand the base of the cupcake and the top. Trace onto felt and cut out. Glue the 'frosting' to the base so that it overlaps the bottom half. Take a small piece of ribbon and glue this to the base of your cupcake. Next get your buttons and attach these to look like sprinkles in the frosting. You can sew or glue these on. Finally, get your magnet and glue this to the back in the middle. These work well as fridge magnets.


I found these Flannel reindeers and thought it was such a clever little gift. Simple and festive.


For the little ones or those who like quick results, you can make a personalised bookmark. You will need some card, stickers, wire and beads. Cut out a shape big enough to be a bookmark then get your child to decorate it with stickers. You can then cut a hole/shape at the top of the bookmark and thread through some beading/craft wire. Get some beads and have your child thread them onto the wire. Form a knot at the other end of the wire to finish the strand off. To make the bookmark more long lasting you can laminate it or cover in sticky back plastic once the stickers have been applied.


Finally, home made cookies are always nice to receive and are easy to decorate for children of all ages!

I hope these posts have inspired to make something truly personal this Christmas.

Happy making!


Tuesday 11 November 2014

QUICK AND EASY DIY GIFTS - PART TWO

Now that we've made something for the kids, how about the grown ups?

I have taken much inspiration from Pinterest over the years to make lovely gifts for friends and family. Sometimes it hasn't always gone to plan or lasted as long as I would have liked but always it comes from the heart. I just love planning out someone's gifts and including some home made treats. In this post I will share some gifts I have made in the past along with the blogs/tutorials I have followed to create pretty things!


Something that needs little guidance on is Decopatch. There are so many pretty papers to choose from and hundreds of items that can be personalised with them! I have used them so much to redecorate items in my home as well as adding a personal touch to a gift. You can use regular PVC glue (I prefer to use Mod Podge but that can be expensive) which acts as a glue to attach the paper to the items you have as well as being a finisher to protect the item.

You can purchase all manner of words, frames, jewellery holders etc as well as mache shapes which can be easily transformed with Decopatch papers. 

I took this plain white 'Bathe' sign and decopatched it in paper which would complement the bathroom of the recipient.


I have also done the same thing with a 'Home' photo frame. You can purchase mache letters and paint or decopatch those, perhaps spelling out a name, a particular word like 'Home' or 'Eat' for the recipient to hang in their home.

You can embellish any simple item and make it personal to the recipient very cheaply and quickly.

Here I have purchased a plain cushion and a pack of craft buttons. I have then glued the buttons onto the cushion (you can sew them on of course) using a heart shaped template that I made in Word. I used fabric glue but needed something stronger for the bottom buttons so used hot glue. You can also make felt flowers and glue or sew these onto a plain cushion. There are lots of tutorials for felt flowers but these are my favourites Ruched felt flowerFelt rosesSimple felt flowers, and Felt flowers for a cushion.


The last link I have used to embellish cushions. The only thing I would say is the backing needs to be glued very well to the flowers, else they will fall off!


Another very easy idea is to make a body scrub. These take only a few ingredients and it is very easy to pretty up a jar.


Here I made a label for the top of the jar, a tag with directions for use and a coordinating ribbon. I also purchased a small wooden spoon.

My favourite scrub recipes are:-

Coffee body scrub
Simple scrub recipes
Lemon sugar scrub
Candy cane sugar scrub

Hampers are a nice way to gather home made and bought items together to create a really unique and personal gift for someone. It can be completely themed, for example, tools, seeds, journal and hand cream for a keen gardener, or it can be made of little treats that you know the recipient will love.

Here is a little breakdown of a 'treat' hamper I made a few years ago.

These are very easy truffles to make and I made them look like baubles with edible glitter. I purchased candy cups and boxes and lined them with paper, sealed with a Christmas sticker.


This is the recipe for the Gingerbread truffles Wilton truffle recipe, but it can be altered for any flavour you like. You can also use chocolate rather than candy melts.


Next came some Apple and pear chutney. I made this in my slow cooker which after peeling the apples and pears made the whole process a lot easier! I sadly no longer have the recipe but found this delicious sounding one! Spiced apple chutney.


I also think it is nice to receive some home made liquor! These are different flavoured vodkas!


Some of my favourite recipes are
Starburst vodka (can also do this with Skittles!)


I purchased some cute baskets, a little purse and earrings and added those to the home made items.


All wrapped up in cellophane and tied up with ribbon! All done!

For more DIY inspiration come back for part three when I show you some gifts the kids can make.

Happy making!