Tuesday, 30 September 2014

SPARKLY BOO DOOR HANGING

inspireduk.blogspot.co.uk


Just a month to go and it's Halloween! I just love Halloween, ever since I was 2 and went trick or treating for the first time! I used to love making decorations to be hung on the door, survey my haul of candy when I got home and then continue to pass out the bags and bags of candy my Dad brought home for the neighbourhood kids. I always make a big show of our house to welcome kids to come and knock. This year I am adding some DIY decorations to pep up what I already have. I saw these pins herehere and here on Pinterest and they inspired me to make something similar for my front door.

I purchased some small mache letters from Hobbycraft (purchase here) and surveyed what I already had at home in terms of decoration!
I am all about the sparkle so set out my pots of glitter, Halloween paint colours, orange ribbon, glue and clear sealer. I didn't have any orange glitter to hand but the clear/white was a good substitute.


First things first! Paint the letters! The black only took one coat with a little touch up here and there, though the purple and orange colours needed a couple of coats to get a nice solid finish.


 I love painting, even if it is only some letters!


All painted and looking festive already!

Next came the fun and messy part! My husband said I had a nice glittery beard going on by the end of it! Nice!

Spread a nice layer of mod podge or any other type of craft glue you have on hand to the top of your letter. Take the glitter and sprinkle carefully and generously over the letter. Tap off the access to see if you have missed anywhere and repeat if necessary.


Glitter going on.


Tapped and glittered. Don't worry if you can see the glue, it should dry clear but check the glue you are using first.


When dried, start on the sides of your letters. I found I could do one or 2 sides of each letter and by the time I was done with the third letter I could go back to the first and do the remaining sides.


Ta da! Well on the way here but of course glitter has a habit of coming off all over you and your clothes! Time for some sealer! I took the letters outside in my trusty box and gave them a liberal spray on top and sides. Let your letters dry completely.


The glossy nature of the sealer I used really brought out the glitter in the letters. Some of the glitter did still come off when I tapped the letters but it was much less than without some sealer. I highly recommend it!

Lastly I had to attach the letters together to make the hanging. I took my ribbon and eyed roughly what I would need and played around with the letters until I was happy with the gaps between them.


I used 3 pieces to attach the letters rather than one long piece.
I used my hot glue gun to seal the ribbon onto the back of the letters as well as making the loops.


At the top I glued a loop to the top then added a smaller loop in the other direction to make the hanger.

All done!


I found the plastic spider lying around from another Halloween so put him to good use!

I am very pleased with how this turned out, especially as it only cost me £3.00 to make! Can't wait to put this up for Halloween! I'll be posting a couple more DIY's ahead of Halloween so stay tuned!

Supplies used:
Mache letters from Hobbycraft as stated above
Americana Lamp Ebony Black - purchase here or here
DecoArt Crafters Acrylic Regal purple - purchase here or here
Orange paint from a set of 8, purchase in any craft shop
Glitter was a gift, purchase similar packs here (currently out of stock online) or here
Mod Podge can be purchased at most craft shops or online
Ribbon is old, purchased as a reel, similar can be bought by the reel or metre in fabric and craft shops
Plasticote Clear Sealer in gloss - purchase in store at Hobbycraft or DIY stores


Wednesday, 24 September 2014

TABLE LAMP MAKEOVER

Well Autumn has finally arrived, the temperature has dropped, the leaves are turning red and orange and I have been thinking about my next big project, my bedroom. I find it easier to get motivated to paint when the room is cool. I have lots of mini projects to share with you, but while I get started I wanted to show you a very easy table lamp makeover I did for my guest bedroom.

When we moved I had a lot of orange accessories and ornaments from my old living room that just didn't fit with our new living room. I decided to put these to good use by decorating the guest bedroom in shades of orange and red. To me it creates a cosy warm look but bright enough to be inviting in the warmer months.

I had some old table lamps that I no longer had use for, but didn't want to get rid off them. Pretty huh? They were pretty expensive to buy as they came with a whole load of bedding and accessories. The bedding has long since gone but I hate to throw anything away that I can reuse elsewhere.


I decided I would try and update them to fit the new bedding I had purchased for the bedroom. I also looked at the colours of the cushions and wall hanging that I planned to use in the room too and went for a nice warm orange. I wanted a sealer over the top of the fabric paint so that it would last longer. I plumped for a glitter finish, just because! I also wanted to add some trim to the bottom of the lamps and purchased some gold ribbon. I bought around 2m of this along with fabric glue to apply it with. Finally I looked at the stems of the lamps and decided silver was just not the way to go with the look so purchased some metallic craft paint in gold.


I could have done with a base coat to help cover the pattern on the lamps, however, with enough coats these can no longer be seen. I used a normal brush and started painting in downward strokes all over the shade. I let each coat dry before continuing.


As you can see, one coat was not enough to cover the pattern at the base of the shade. Fortunately, the pot of paint was just enough to cover both lamps a few times without the need to buy more. Once it had completely dried I painted on one coat of the sealer. This was quite enough given that is gives a glitter finish. I love the way the light hits the glitter on the shades and how they look when lit up.

 All glittered up!

 See how the light catches the glitter?

In the meantime I also painted the metal stems with the metallic paint I had purchased. This was not easy! Even with light sanding the paint would smudge and rub off when painting with the brush. But I persevered (I couldn't really go back by this stage!) and by 3 attempts the stems were gold! They did take a long while to dry between coats so be prepared to wait awhile!

The last thing to do was to attach the ribbon trim to the bottom of the shades. I used some fabric glue and very carefully and slowly applied the ribbon around the base.  I wasn't completely happy with them though, they looked a little...well, plain. Yes I know even being bright orange and covered in gold glitter and ribbon I thought they looked plain! I suddenly remembered I had some home decor stickers that I had purchased years ago and never used, so hunted them out and added them as a border above the ribbon trim. I overlapped these slightly and turned them on their sides to represent diamonds. They seemed to fit better that way. Now the magpie in me was satisfied!

All done!

They now sit proudly in the guest bedroom surrounded with bedding, wall hangings and ornaments that complement them. I love how they turned out!


I realised after I took this shot that the cats must have been in and sat on the cushions, they look a little squashed!

Also as a side, I purchased a cheap white pendant lamp and gave that the same makeover as the table lamps. It was not a great finish on the pendant, the fabric was obviously different from the lamps so brush marks really showed. However, when it's near the ceiling who can really see? And it does fit in with the rest of the room!


Hope your week is inspired to have a go!

Friday, 19 September 2014

GETTING READY FOR HALLOWEEN

Carving pumpkins


I just love Halloween! It is my second favourite holiday! As a child I grew up with a lot of Americans, so participated in many typically American things, like Halloween. Halloween has only really got big in Britain in the last few years but I have been decorating the house, holding parties and generally enjoying the time for many years! I am getting ready to make costumes and scouring the shops already for tasty treats! I am sharing some of my home made details used over the years below along with some of my favourite pins from Pinterest. Enjoy!

Some of the many pumpkins carved by my other half. He is so much better at this than me!

 This one is double sided, he was just showing off!

 Jack Skelton


Token one carved by me and my kid!

I have to say that my creative side hasn't stretched too far to the outside of my house. I have pretty much bought up shops instead to decorate the house with giant spiders, bats, pumpkins etc! It always looks very festive and sticks out in a sea of non decorated houses. All the candy pretty much goes in the night! But one year I saw some black pumpkins on Pinterest and decided to have a go. I had made an easy cloak one year for myself so decided to use that as part of the body (ie plant pot) and plant my old witch hat on top. The paint was tricky to paint on, it kept rubbing off but it did the job for the night!


I plan on having a few more home made touches this year.

If, like me, you enjoy holding a party, it is easy to get creative with food and decorations.  I have had pumpkin carving parties, fancy dress parties, children's parties and small gatherings all appropriately decorated and themed. I'm sharing some of my favourite bits below!


There always has to be cake, a party without cake is like a fish without water! The cake above was made using the Wilton Jack-O-Lantern pan. The pan has long been discontinued but you can find them occasionally on EBay and instructions on how to decorate it can be found here on the Wilton site. However, you could achieve this look with a round pan and shape it slightly to look more like a pumpkin. It's very simple too!

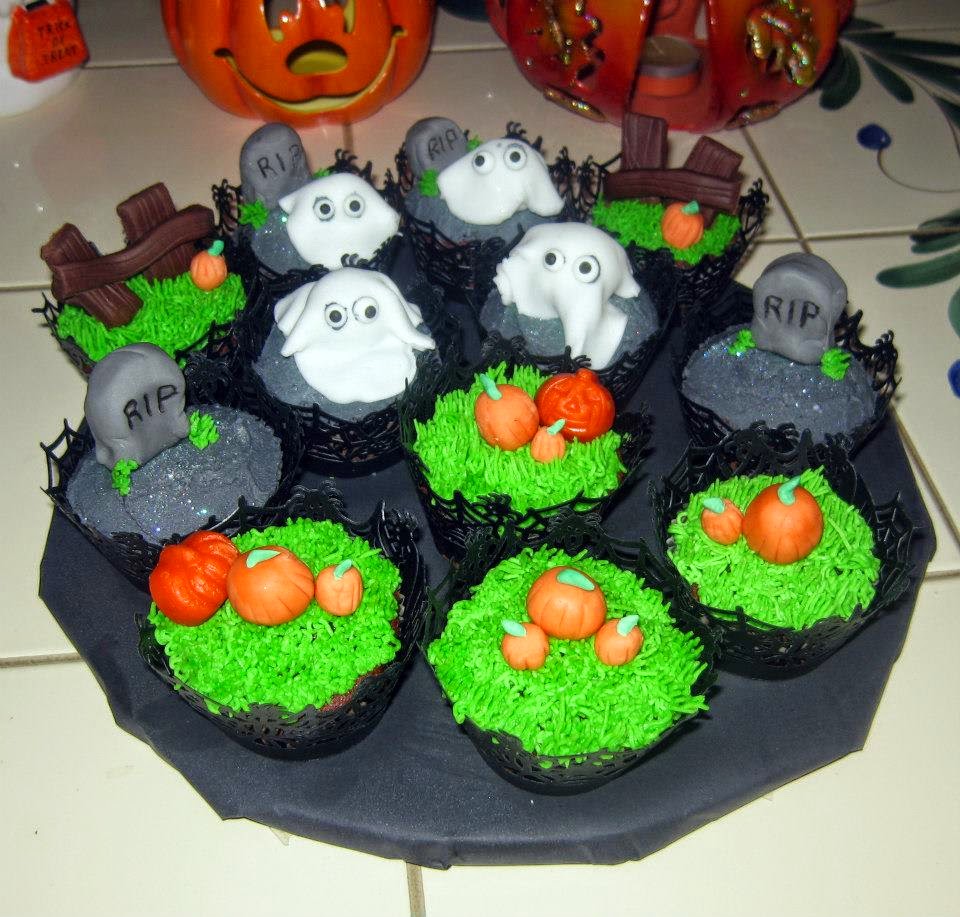
If you want cake but don't want a huge cake, may I suggest cupcakes! These were easier than they looked!


The ghost and graveyard cakes were frosted quickly with grey icing and edible glitter, then I hand shaped the tombstones and wrote on them with an edible pen. The ghosts started out as a ball of fondant (though you could use marshmallows), then I rolled and cut out round shapes of white fondant and draped these over to get a 'sheet' effect. I then used edible pre made eyes which I fixed on with a little icing.
The pumpkin patch cakes used the Wilton grass tip #233. Then I hand shaped some pumpkins (and also used some candy pumpkins and placed on top. At the back I used some chocolate fondant and cut out long rectangle shapes. I scored these with a knife to give the look of a wood fence and placed these on. They were a little tricky to stand upright as I placed them on as soon as they were made. If I had left them to dry for a while this would have gone smoother.

If you are looking for even smaller cakes you could try cake pops! I made a batch of pumpkin shaped ones along with monsters. Here are the monsters.


These were inspired from this pin and look very similar, though not as neat! I again used the edible eyes to make this easier.  Check out my board for more inspiration!

If you aren't the decorating kind, perhaps whoopie pies would be the way to go?


The recipe for these was from a book called simply Whoopie Pies (you can get it here). They were pumpkin whoopie pies and I used home grown pumpkin for them. But you can use the canned variety. They turned out pretty big and were filled with classic marshmallow and finished off with candy corns. Simple yet festive!

Another super easy idea especially if aren't a decorator is ghost brownies!


All you need to do is make a batch of brownies, then get a large marshmallow and place on top of each. Next make vanilla buttercream and warm it up so that it pours (or buy canned ready made and warm it up in the microwave) and pour carefully over each marshmallow. They don't have to look the same, just ghost like! Then take some normal consistency frosting and pipe features onto your ghosts (you could use edible candy eyes to make it even simpler). I threw around some candy corns and pumpkins along with plastic spiders to pretty them up (and to hide the fact that my cake board was too big).

OK if cakes aren't your thing but you like something sweet, how about marshmallow pops?


What you will need are large marshmallows, come candy melts and green straws. Take your marshmallows and insert a green straw into each. Dunk into the orange candy melts and let set. Get some black candy melts and pop into a piping bag and pipe features onto your pumpkins. Job done! You could use frosting if you have that onto hand instead.

And what about other treats for your party? 
You can find plenty of savoury ideas along with decorating, costumes and sweet treats on my Halloween board. But here are a couple I have done in the past that were a huge hit!

Firstly make your sandwiches festive and fun. Turn them into bats!


All you need is a bat shaped cookie cutter (or any other Halloween shape you fancy), some cream cheese tinted grey and your favourite fillings!
I made the sandwiches then cut out the shape. I piped grey cream cheese faces and they were done.

Another fun idea is cracker sandwich spiders.


Take some round crackers like Ritz and spread peanut butter on one. Place another on top then get some pretzel sticks and stick these into the peanut butter. Finish off with raisin eyes fixed on with a little peanut butter! 

What a spread!


As you can see there is plenty of normal fare there along with tradition candy corns and pumpkins. I also managed to find some Jack-O-Lantern shaped gingerbread cookies. Perfect party food!

I hope you are suitably inspired for this year's Halloween!


Wednesday, 17 September 2014

PRETTY PUSH PINS AND PIN BOARD


Since the middle of this year I have a dedicated craft space. I included a little reading nook, shelves and photos to make it more homely and I absolutely love it! It can get messy, well when being creative who doesn't?, and this summer it got very messy with birthday party prep!  I have finally tidied it up and have decided I need a pin board to keep a list of all my many projects. Right now I am working on my bedroom makeover, Halloween and thinking about Christmas! Not to mention some other little details I want to add to the craft space.

Firstly I took a regular wooden frame (mine was painted white so I sanded it down). I chose a paint colour that would complement my room and purchased some silicone glue. It wasn't the best decision as when it dries it goes quite rubbery, so didn't give me the exact finish I was after. In future I would choose a different dimensional glue or something like this dimensional paint. Once my frame was sanded I took the glue and drew a pattern onto the frame. This was to give it a raised effect and look carved. Once this was dry I painted over it. This took a good couple of coats and I also varnished over the top to give it a nice glossy look.


I discarded the glass and cut a piece of cork to the size of the frame. This was a little tricky to get in the frame but once it was in there I knew it wouldn't be going anywhere! The only downside is that the cork isn't very thick so may need to be replaced sooner rather than later.

I didn't want just regular pins so decided to pretty some up. This is so quick and easy but looks cute. I started by looking at some embellishments I had on hand. I decided to stick to a teal blue colour, brown and tan to complement the rest of my decor.

 Lots to choose from!
 Nice shades of teal blue
Pretty buttons

I selected 12 as I thought this would be plenty for the board. You could use more or less depending on the size of your own pin board.

 Regular brass pins
Buttons and sequins selected

I have a mini glue gun that is perfect for such crafts. I took a pin and squeezed a blob of glue on the head. Then I took a button and placed it on. Done!

 Glue
 Blob
Done!

I selected some sequins to glue as well. I did the same thing by blobbing glue onto the head of the pin. I then placed the sequins on in a circle before adding a bit more glue and a couple of sequins on top. This gave the impression of a little flower.

Blob of glue
Stuck on into flower shape

This was so quick and easy and turned something ordinary into something cute.


The paint I used for the board was Americana Desert Turquoise. You can purchase this herehere or any other craft shop.
The buttons are Hobbycraft's own and can be purchased from their shops.
Cork can be purchased on a roll. I purchased mine here.