Showing posts with label decopatch. Show all posts

Tuesday, 28 July 2015

Nail Polish Rack DIY


A couple of months back my friend introduced me to a warehouse housing all manner of vintage, recycled and new items called Molly's Den. Check out their website here. It is a giant treasure trove housing pretty much anything you can think of! It was very hard to choose what to buy! I did go with a purpose but that soon went out the window when I saw how much was there.

I just loved the metal key shaped key holder!

Pretty bottles and bowls.


This was one of my favourite things, so naturally it had to come home with me!


Here it is looking pretty on my shelves in my reading corner.

I also picked up a wooden seed tray to make a nail polish rack.

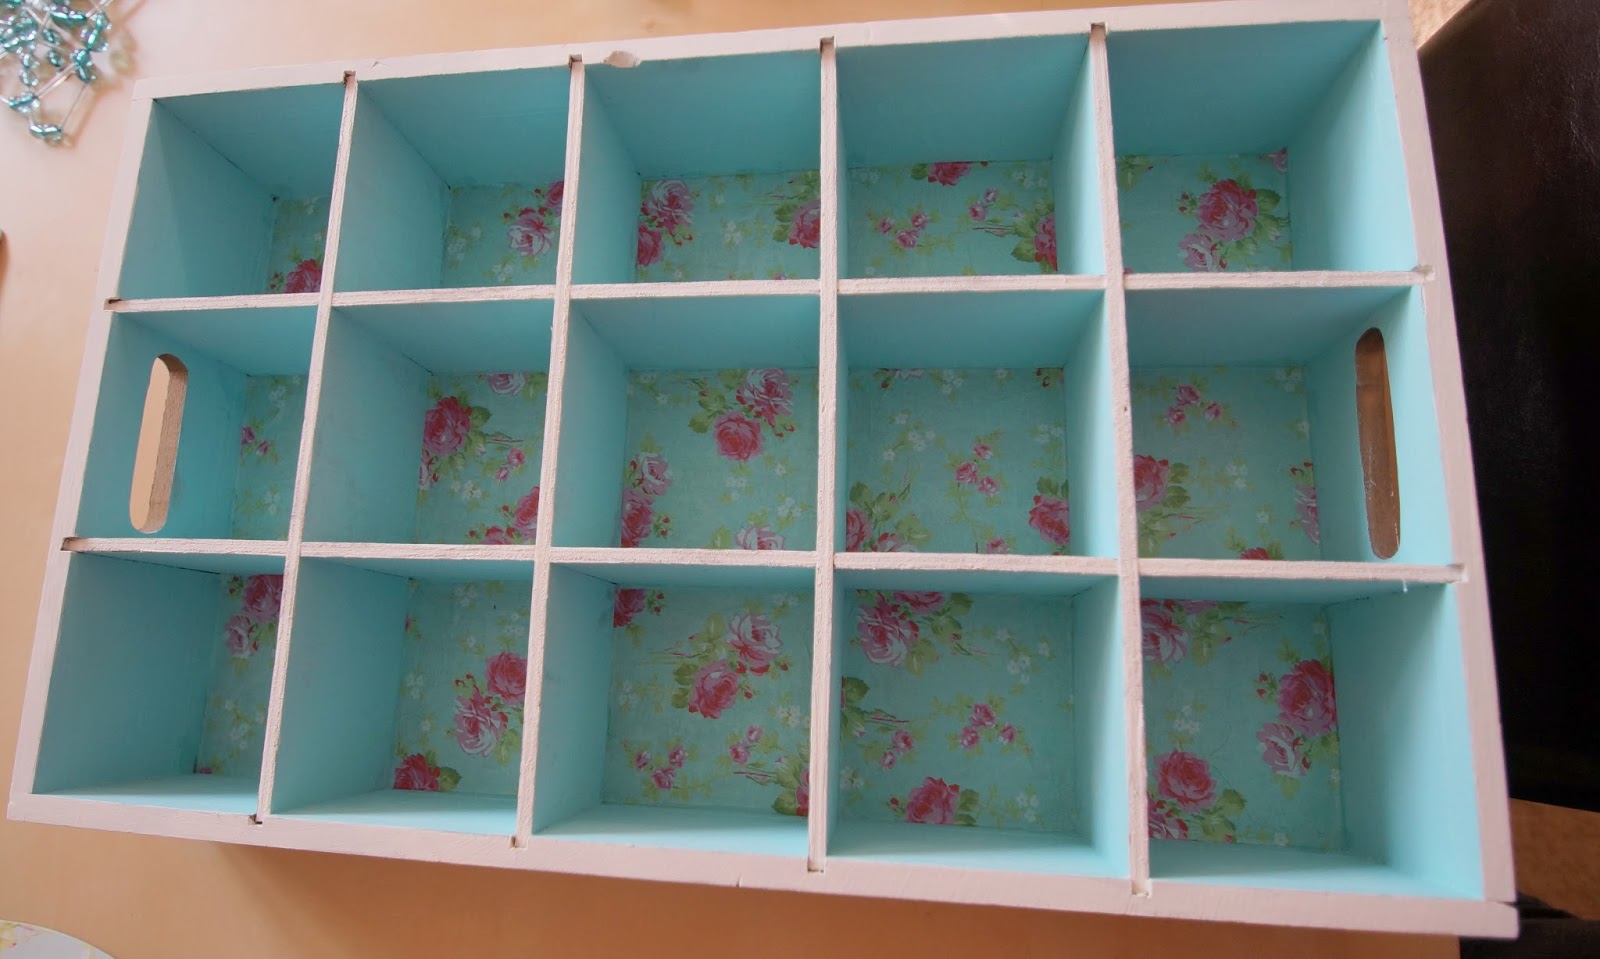
I liked the rough feel of the seed tray and the stamped sides. I did want to pretty it up though, so I began by giving it a clean and then painting each compartment.


I decided to leave the sides of the box as they were.


The wood soaked up the paint so 3 coats were necessary for complete coverage.


I then cut some squares of Decopatch paper for the inside of each compartment.


I used this bright pink and light teal paper which I had previously used on my jewellery box.


I measured the squares and cut the paper to fit.  I applied glue to the back of each compartment and fixed a piece of Decopatch paper to it.

You can see that I didn't bother with as many coats of paint for the back of each compartment as I planned to cover with the paper like so. The sides have a more solid look of colour.

I continued to do this for each compartment, and once dry I painted over each stuck piece with glue to seal it.


I had originally decided to leave the edges like this, unpainted. However, a little off white paint soon changed my mind!

All finished, now to fill it up with nail polish!


Admittedly you can't see much of the back but there is a little hint poking through. 


I took these photos before we made over the master bedroom. The plan is to affix hooks to the back of the rack so that it can hang on the wall. It's one of the many little jobs left to do to make the bedroom even prettier!

Hope you are enjoying the school holidays!


Wednesday, 25 March 2015

DIY Easter Wreath

So earlier on this year I decided I wanted to make a wreath for Easter. I had repurposed an old wreath for Christmas and had enjoyed making it and displaying my own work. I thought about buying a basic wreath that I could update for other holidays and seasons and then I had the bright idea of making my own wreath from scratch! Good idea in theory but as you will see I didn't completely think it through and had to improvise so as not to waste everything I had done and bought! As well as the wreath almost being a disaster I took pictures of my work in progress only to realise that I didn't have the memory card in the camera half the time! So some of the details have no pictures, you will just have to use your imagination!

My bright idea was to use items I already had to make a basic wreath shape and then purchase just a few bits of pieces to decorate it with. The point was to show a cheap way to make a wreath!

I started with a bunch of yellow pipecleaners. I wound them around themselves to provide a round shape.


I had lots from some project ages ago!


I took each end and wound it round another.


I made it as tight as possible so as to not have any sharp edges.

I wound extra pipecleaners over the top of these for structure (hah!).


This left me with this shape. It had very little stability at this stage so I got some yarn and began to wound this round tightly. I did this in stages to make it easier to wind around, knotting the yarn every so often in place.


This gave it the structure I needed, or at least what I thought was sufficient!


I purchased a pack of Styrofoam eggs, some wooden butterflies, wired flowers and paper flowers. For the eggs I painted some with acrylics very roughly to get a marble effect, while the rest I decopaged with tissue paper I already owned.


You can see the rough paint job here. I used acrylic paints that I mixed together to gain these pastel shades.


I did the same with the wooden butterflies which I really love!


I then began to decorate the wreath. I started with the wire flowers and wound them around the wreath in various places to space them out. I then used hot glue to attach the eggs and other flowers. I used some of the left over tissue paper to make paper flowers which were great fillers.


I strung the butterflies with some fine cotton and knotted these to either side of the wreath, covering the knots with eggs and flowers so that they hung in the middle.

When I was done I picked up the wreath to see any gaps and that's when I realised that the whole thing wanted to sit like a giant egg! It looked awful! I was going to jack the whole thing in but I didn't want to waste all the pretty things I had bought, so I spotted this massive cardboard photo prop I had used for a long ago birthday and traced the wreath onto the back of it. This is where you have to use your imagination as clever clogs here had taken the memory card out and didn't notice the camera flashing warning me about it until it was too late!

I cut a large cardboard circle out and glued the wreath to it. I then carefully cut this to fit more neatly to the already finished wreath. As the wreath was already covered at this point, I couldn't get as close as I would have liked so added more tissue paper flowers and some large felt butterflies that I had laying around to cover it over. I also had left over all the middles to my die cut flowers from my Spring garland which made good fillers too. The cardboard gave the wreath the structure it needed to hold a round shape. Definitely not the way to do it and I certainly won't be using pipecleaners in this way again! I will just buy a plain wreath in future!!


The overall result after the disastrous DIY isn't too bad. I think some green foliage would have been a nice touch to break up the colours a bit. 


I am pleased to say I can't see any cardboard!

Have you made a wreath for Easter? Have you had any disasters? Share on my Facebook page! At least to make me feel better!

Happy Wednesday!


Friday, 13 March 2015

Last minute Mother's Day gifts


Mother's Day is bittersweet for me.

When my son was born we did a lot of family gatherings to include the Grandmother's in the celebrations. I got a little frustrated as time went by as I never really felt honoured on that day. Some times I think it was down to me not truly feeling like a Mother, and then there was this feeling that the only important people to celebrate were the Grandmother's.

Things changed and I started to feel more celebrated as a Mother. Life was good and we still honoured the Grandmothers with gifts from us and our son.

Then that all changed when my Mum passed away. It was shocking, horrible and the biggest loss of my life. I miss her terribly, we were a unique team and she was my biggest supporter. I miss her warmth, her chats on the phone, her love for my son, and laughing with her about times gone by. Mother's Day just isn't the same anymore. However, my son still has a Grandmother who loves him very much so we honour her with gifts from all of us. You would have seen the Mother's Day Planter that my son made for his Grandmother. It was still fun to help him with that, to nurture his creative side and to see the pride in his face from a job well done!

My family honour me greatly on Mother's Day and totally make the day all about me. I take great pleasure in that and focus on their love rather than feel sad on that day.

As my son loves to make gifts almost as much as I do, I thought I would share some easy gifts to make in case you are still lacking inspiration this close to Sunday! A homemade gift is such a special treat.

HEART HANGERS


These little hearts are a great way to say 'I love you' to Mums and Grandmothers! The first is made out of wood, painted in a bright colour, with the initial of the recipient. I showed how I made this in this Little heart hangers post.
The second is a plain fabric heart I picked up at a craft store (though you could sew your own), which I then glued flower sequins to and embroidered the word 'Love' in the middle. You could embroider the name of the recipient, or simply 'Mum'.


HEART CUSHION

If you prefer to work on a larger scale, you could make this heart cushion. This is totally no sew, so perfect for those of you, like me, who have trouble sewing on a button, let alone anything else!

I purchased 2 different coloured fleece blankets from Tiger (there's that store again!) and made a heart template out of paper. I then traced the heart onto both pieces of fleece and cut it out. I laid the 2 pieces of fleece over one another and pinned in place. I took my fabric scissors and cut a fringe into the edge all around the heart shapes. Once that was done I began knotting the 2 coloured fringes together. Leave a small area unknotted so that you can fill with stuffing before completely knotting up. This is so easy!


RESIN FLOWER EARRINGS

These flower earrings are by far the easiest 'craft' on here! I purchased a pack of resin flowers from Hobbycraft along with earring backs.


I used hot glue to glue the earring backs in place on the resin flowers. Boom! Job done! Easy, yet unique earrings!

ARM KNITTED SCARF


I am not a knitter, and I am currently learning how to crochet (with very mixed results!). I knew I wanted to have a go at something knitted and I had seen these arm knitted scarves all over Pinterest. After studying a few videos and not getting it AT ALL, I almost gave up, until I found Flax and Twine and her brilliant picture tutorial! It all just fell into place and I was able to whip up a scarf in about 45 minutes!  I was able to make 2 scarves from 2 balls of wool. Have a look at the tutorial here. I have even used it to start an arm blanket. I am not quite finished with it but hope to have it on the blog soon.

PERSONALISED NOTEBOOK

If your Mum or Grandmother loves writing, or uses notebooks on a regular basis, then how about a personally decorated notebook, just for her?

All you will need is a plain note book (yes this one is from Tiger!), some decopatch paper, PVA glue, paintbrush, small piece of ribbon and any other embellishments you fancy.


Start by measuring out your paper, leaving enough to wrap around the inside of the books cover. Take some glue and cover the back of your paper. Apply this to the front of the book and leave to dry. This can get creased but I have read that it is best to leave it to dry rather than try and smooth out the creases. I did try this and it worked for the majority of the paper.


Cut into the corners of the paper so that it can be folded over to the inside of the book. Glue down. I then took a piece of plain card and measured it to fit inside the book. I glued decopatch paper to this card and left it to dry. Next I took a small piece of ribbon, and cut 2 matching lengths,enough to allow it to be tied in a bow. I glued this down in the middle of the inside of the book. I then took the piece of card and glued it into place over the ribbon and edges of the front cover. I then did the exact same thing with the back of the book.


The book can now be tied together with the ribbon to stop it opening up inside a bag. I finished off the book with a little wooden heart.

I left the spine clear to allow easier application of the paper. Plus as the book was white and the dots are white it complements the design well.

There you have it! Any of these can be made before Sunday in no time at all.

I hope you enjoy Mother's Day, either as the Mum, Grandmother or the child.